Showing posts with label chocolate. Show all posts

Saturday, August 18, 2012

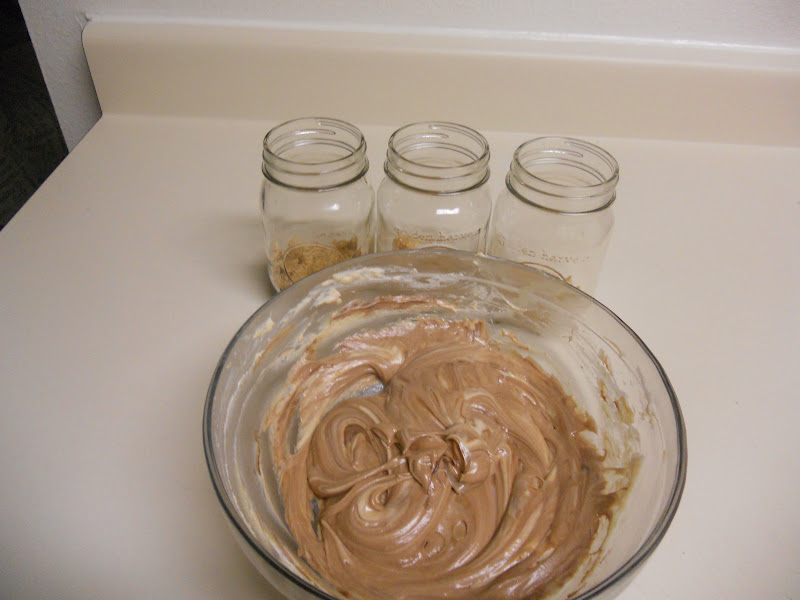
Chocolate Peanut Butter Cheesecake Mousse


I made this for dessert for our first girls’ night dinner. As you probably know by now, chocolate and peanut butter is my favorite flavor combination. Don’t get me wrong, I love it all. But when in doubt, I always go for some sort of peanut butter chocolate concoction and am never disappointed. And in a pinch – ya know, those times where you absolutely need dessert to cure whatever troubles you have but haven’t gone food shopping in weeks and can’t imagine moving more than the ten steps from your couch to your kitchen - a spoonful of peanut butter with a couple chocolate chips saves the day.
This dessert is a little more labor intensive than dipping a spoon in peanut butter and shoving it in your mouth but not by much. And it’s totally worth it. I whipped this up right before dinner so it would be nice and chilled by the time we were ready.

The mousse was a little hard to make because my apartment was SO HOT. I don’t think that the whipped cream got as light as it would have in an air conditioned venue. But I’m trying to conserve money and it’s more important for me to have cable so that I can watch TLC all night than it is for me to be cool.  Priorities, people.

For a mousse, this dessert is very rich and dense due to the cream cheese (again, also probably due to the sweltering heat of my kitchen suffocating the whipped cream). It tasted like a softer no-bake version of chocolate cheesecake. Minus all of the time and effort! If you wanted a lighter dessert, it would probably be delicious if you completely cut out the cream cheese and cut the sugar in half. You would obviously lose the cheesecake taste but it would be lighter… if that’s what you like.  I generally like my desserts so rich and sweet that a normal human being could only take one bite, while my sweet tooth and I can finish off a gigantic plate and look around for seconds.

I obviously chose to top the mousse with chopped Reese’s Peanut Butter Cups. Because… well, why not jump at the chance to pack a little extra peanut butter and sugar in there? And the crust is totally optional. I tend to like a little graham cracker for the texture and because it looks pretty at the bottom of individual portions. But feel free to leave it out if you’re not feelin’ it.

So give this rich and creamy mousse a try for yet another twist on the classic chocolate peanut butter combo! 

Chocolate Peanut Butter Cheesecake Mousse (4 servings) from Saving Room For Dessert
  • ·         4 ounces cream cheese, room temperature
  • ·         1/3 cup confectioners' sugar, sifted
  • ·         dash of salt
  • ·         1/2 cup creamy peanut butter
  • ·         1/4 cup milk chocolate chips, melted
  • ·         1/4 teaspoon vanilla extract
  • ·         1/2 cup whipping cream
Toppings:
  • ·         4 Reese’s cups, chopped
  • ·         1/2 cup whipping cream, whipped and sweetened with 2 tablespoons confectioners' sugar
Graham Cracker Crust
·         2 tablespoons butter, melted
·         3/4 cup graham cracker crumbs
  1. 1.      Mix together butter and graham cracker crumbs. Push to the bottom of parfait dishes, mason jars, wine glasses, etc.
  2. 2.      In a medium mixing bowl beat the cream cheese, peanut butter, salt and vanilla together until smooth. Melt the chocolate chips and stir into the cream cheese-peanut butter mixture. Sift in the confectioners' sugar and blend well.  In a separate bowl beat the whipping cream until stiff peaks form.  With a rubber spatula, gently fold half the whipped cream into the peanut butter mixture.  Then blend in the remaining whipped cream taking care not to over mix or beat the mixture.  
  3. 3.      Spoon the mousse into 4 serving bowls and refrigerate for about an hour.  Top with additional sweetened whipped cream and chopped Reese’s if desired.  Serve and enjoy!


loving my mason jars :)


Saturday, June 2, 2012

Individual Icebox Cakes

Part II of my mom's birthday!

My mom doesn't have a huge a sweet tooth. I can't decide if I'm jealous of her or not. Unlike me, she does not crave sugar, chocolate, peanut butter, candy, cake, cookies, ice cream, and anything dessert related constantly. Seriously, sometimes it's a battle to make myself stop baking cupcakes, seal the bag of gummy candy, and eat some real food. However, she also doesn't understand the happiness and satisfaction that I feel when I sit down each evening and indulge in my nightly dessert at exactly 9:30. Pure. Bliss.

Anyway, I asked my mom what she wanted for her birthday dessert. I sort of expected her to say "nothing" or name someone else's favorite dessert. But she surprised me and immediately told me that she had been craving a mint icebox cake. Your wish is my command, mom!

delivering the requested goodies!


My grandmother always used to make an icebox cake with creme de menthe in the traditional log form. As I've mentioned before, I'm not in love with mint. And if I'm going to make a dessert, I want to be able to enjoy it. I prefer my refrigerator cake flavored with Kahlua. Coffee and chocolate is always winning combo in book. I know my mom agrees because, though my sweet tooth is a personal struggle, I get my coffee addiction from her. However, my mom specifically mentioned mint and her boyfriend despises coffee so I was torn. That's when I came up with the idea to make individual icebox cakes!

The individual icebox cakes are far more tedious to make than the log but I like them better. The traditional icebox cake is supposed to be sliced at an angle so that you can see the cookie layers. In reality, it always ends up looking like a bowl of mush because the cake is too soft to slice or dish out. The individual cakes are so cute and the layers stay in place as you dig into it with your fork. Also, it's perfect portion control! And you can make exactly as many servings as you want/need without any guesswork. The individual desserts solved the problem of flavors because I was able to make half of cakes with creme de menthe and half with Kahlua. Most of the people wanted to try both so I ended up cutting the cakes in half. I stuck strictly with my Kahlua and my mom's boyfriend stuck to his mint... the true stand-off of flavors. Everyone enjoyed the cakes and thought the individual desserts were a great idea!


my mom satisfying her tiny sweet tooth :)


Individual Icebox Cakes (yields about 15 individual cakes) adapted from Smitten Kitchen
  •  2 package of Nabisco chocolate wafers
  • cupcake liners
  • Hershey's chocolate (optional)
  • chocolate covered espresso beans (optional)
For the whipped cream (adapted from How Sweet It Is)
  • 1 cup heavy whipping cream
  •  1/4 cup alcohol (I used Bailey’s Irish Cream and creme de menthe)
  • 1-2 tablespoons powdered sugar
  • 1 teaspoon of vanilla extract
  1.  Flatten 15 cupcake liners.
  2. Whip the whipped cream ingredients until the whipped cream holds firm peaks. Spread about two teaspoons whipped cream between each cookie, to the edges, and stack them on a cupcake liner until you reach the height you’d like (I made each cake using 5 wafers). 
  3. Use a knife to spread frost the entire individual icebox cake with whipped cream. 
  4. Garnish cakes with chocolate shavings and/or espresso beans.
  5. Set them in the fridge at least overnight or up to a day. The cookies will soften as they set, and become cake-like.
  6. Serve immediately from the refrigerator. 


creme de menthe whipped cream
5 cookie stack!
creme de menthe and kahlua


Sunday, April 22, 2012

Cookies and Cream Cupcakes

Happy Earth Day!

I love "holidays" because they are an excuse to bake themed goodies. My friend, Michelle, and I decided to get together to bake some earthy cupcakes and drink fruity beverages. We decided on cookies and cream cupcakes and peach bellinis. YUM!

made with $5 Andre champagne and peach Bacardi with frozen blueberries for ice :)

The cupcakes are great for several reasons. The bottom is half of an Oreo cookie, cream side up. The cake portion is a dense vanilla cake with HUGE chunks of Oreo. I'm glad that I decided to go with chunks instead of crushing the Oreos because it gave the cupcake a nice texture. Oh, and the cream cheese frosting. No explanation necessary.

We decorated them with crushed Oreos to look like dirt and stuck some gummy worms on top. We also tried to make flowers on some with Skittles. Not quite as cute as we had envisioned but juuuuust as tasty. 


The only issue with this cupcakes is that we overcooked them a bit. We took them out and noticed that they were a little gooey on top so we decided to throw them back in the oven for a couple minutes. When we took them out and let them cool, the tops and sides were a little hard. That's when we realized that the gooey-ness was probably due to the cream in the Oreos melting. So don't be fooled by the sneaky goo! They still tasted delicious, just not as moist as they could have been.

Cookies and cream is always a crowd pleaser with kids and adults. And the surprise Oreo bottom takes the cupcakes to a whole new level. Making these for someone with a serious cookies and cream addiction? Serve it with a scoop of cookies and cream ice cream for a decadent overdose :)

Cookies and Cream Cupcakes (24 cupcakes) from Beantown Baker

For the cupcakes
  • 1 stick unsalted butter, at room temperature
  • 1 cup milk
  • 2 tsp vanilla extract
  • 2 1/4 cups flour, plus 2 Tbsp for the Oreo chunks
  • 1 tsp baking powder
  • 1/2 tsp salt
  • 1 2/3 cup sugar
  • 3 large egg whites, at room temperature
  • 1 pkg Oreo cookies
For the frosting
  • 4 oz cream cheese at room temp
  • 1/2 stick (4 Tbsp) butter at room temp
  • 1/2 Tbsp vanilla
  • 2 cups powdered sugar

  1. Preheat oven to 350F. Insert liners into a medium cupcake pan.
  2. Twist apart 24 Oreos. Place the wafer with filling on it, filling side up, in the bottom of each paper liner.
  3. Cut the remaining Oreo cookies into quarters with a sharp knife. Toss with 2 Tbsp flour and set aside.
  4. In a large bowl cream the butter until fluffy, about 3-5 minutes. Add the milk and vanilla and mix to combine.
  5. In a separate bowl mix together the flour, baking powder, and salt.
  6. Add the dry ingredients to butter mixture. Mix until integrated. Stir in sugar. With an electric mixer on low speed, beat for 30 seconds. Turn the mixer up to medium speed and beat for 2 minutes. Add the egg whites. Beat for 2 more minutes. Stir in the quartered cookies.
  7. Fill the cupcake lines three-quarters full. Bake for about 20 minutes (maybe even 18) or until a toothpick inserted in the center of cupcakes comes out clean. Cool cupcakes in the pan.
  8. While the cupcakes are cooling, make the frosting. Place the cream cheese in the bowl of your mixer. Beat on medium-high until completely smooth, 3-4 minutes. Add the butter and continue to cream until fluffy. Add vanilla extract. Add powdered sugar 1/4 cup at a time until desired consistency is reached.
  9. Frost the cupcakes. For dirt cupcakes, garnish with crushed Oreos and gummy worms. For regular cupcakes, garnish with crushed Oreos and half of an Oreo.


Oreo bottoms

flour coated Oreos

unbaked
baked
Happy Earth Day!


Wednesday, April 4, 2012

White Hot Chocolate

Hot chocolate? In April?

Crazy, right? In New York, we had about 2 weeks of 70 degree weather. I was wearing skirts without stockings and trading in my boots for my pumps. I even brought all of my winter coats and heavy sweaters to my mom's house to put in storage for next year.

I jumped the gun, probably due to wishful thinking, because now it's back in the 40s and 50s. New York weather is all over the place!

Anyway, after those two weeks of being spoiled with gorgeous weather, the return to our typical early spring climate left me feeling chilled to the bone. Possibly because I currently have no appropriate coats. So I broke out the white hot chocolate.

I actually can't believe it took me so long to share this easy recipe because I think it's the only reason I survived the winter.  It is absolutely delicious, sweet, and creamy. It's far cheaper than buying a cup at Starbucks and, in my opinion, it tastes wayyyyy better. It's also really simple to make. I had assumed that since coffee places charge 5 bucks for a white hot chocolate, there must be some scientific process or magical ingredients. Nope. Just some milk, chocolate, some spices, and a simple stirring motion. Viola!

There's something about homemade hot chocolate that just screams "There's no place like home!" to me.  I love making a mug of this and curling up under my fleece covers with a good book or some trashy television. It is VERY rich so a small mug is more than enough to satisfy your sweet tooth and warm you up! So until the weather warms up again, I'll be choosing this steamy treat for my nightly sweet tooth indulgence :)

If you need to study or get some work done, pour yourself a half of a mug of strong brewed coffee and fill the rest of the mug with the white hot chocolate. BAM! White chocolate mocha! You're practically a professional barista. 

If it's been "one of those days" and you need a little extra relaxation, this white hot chocolate is also delicious with a shot of Bailey's. Or so I've heard...

White Hot Chocolate
  • 1 1/4 cups skim milk (you can use whatever percentage you'd like; you can even use half-and-half for an extra rich and creamy taste)
  • 1/3 cup white chocolate
  • 1/4 teaspoon cinnamon
  • 1/8 teaspoon nutmeg
  • 1/4 teaspoon real vanilla extract
  1. Heat the milk and spices until almost boiling.
  2. Add the chocolate and stir constantly (so it doesn’t burn) until it is fully incorporated.
  3. Serve with marshmallows and whipped cream. 

so much deliciousness with so few ingredients!

Tuesday, March 20, 2012

Andes Cupcakes

 Another green-ish dessert for St. Patrick's Day!  I'm thinking of starting an official petition to make St. Patrick's Day a "holiday season" like Christmas. This could be huge.

Andes mints make me think of my great-grandfather. He always had them on his coffee table in his living room. I spent countless days munching on Andes, eating corn chowder, and sipping ginger beer on his front porch.

So these cupcakes are dedicated to him.  Love you and miss you Curt :)

In general, I'm not a huge fan of mint in my desserts. It belongs in toothpaste and gum. It does not belong in my desserts messing with my chocolate. I think that's because the mint in candy, like York Patties or Junior Mints, is just way too strong. Andes is the only candy that I think got it right. Also, it's the one that's green rather than white. Green mint desserts are the only ones that are acceptable. Period.


However, I realize that I'm in the minority here. My whole family loves mint flavored desserts. Especially mint chocolate chip ice cream (the green kind... obviously). Because it's such a popular flavor combination, I knew that I needed to be able to make some minty recipes for them. And I wanted to provide something delicious for any mint-lovers who read my blog :)

The mint in this recipe isn't too overpowering because it is in the frosting and ganache but not in the cake.  The cream cheese and butter in the frosting really mutes the mint flavor so it is refreshing but not overpowering.

If you like mint, you'll probably love these. Plus, look how pretty they are! If you want more of a green color, put green food coloring in the frosting. I just really wanted to use a lot of green sprinkles!

Andes Cupcakes (24 cupcakes) adapted from Mel's Kitchen Cafe
Cupcakes: 
  • 2 cups sugar
  • 1-3/4 cups all-purpose flour
  • 3/4 cup HERSHEY’S Cocoa
  • 1-1/2 teaspoons baking powder
  • 1-1/2 teaspoons baking soda
  • 1 teaspoon salt
  • 2 eggs
  • 1 cup milk
  • 1/2 cup vegetable oil
  • 2 teaspoons vanilla extract
  • 1 cup boiling water
Chocolate Mint Filling:
  • 1/2 cup chocolate chips
  • 3 tablespoons heavy cream
  • 1/2 teaspoon peppermint extract
  • 1/3 cup powdered sugar
Mint Buttercream:
  • 1 cup (2 sticks, 16 tablespoons) butter, softened to room temperature
  • 8 ounces cream cheese, softened to room temperature
  • 32 ounces powdered sugar (about 7 cups)
  • 1/2 cup heavy cream
  • 1 teaspoons pure vanilla extract
  • 1 teaspoons peppermint extract
  • 24 Andes mints for garnish
1.       For the cupcakes: Preheat oven to 350°F. Line muffin cups with paper baking cups. In a large bowl, stir together sugar, flour, cocoa, baking powder, baking soda and salt. Add eggs, milk, oil and vanilla. Using a handheld electric mixer or an electric stand mixer, beat on medium speed for 2 minutes. Stir in boiling water. The batter will be VERY thin (Don't fret, it works out fine somehow). Fill the muffin cups 2/3 full and bake for 18-20 minutes. Let the cupcakes cool completely on a wire rack, after removing them from the muffin tin.
2.       For the mint filling: While the cupcakes are baking, place the chocolate chips and heavy cream in a small microwave-safe bowl and heat for 1 minute at 50% power. Stir. Repeat the process until the mixture is smooth. Stir in the peppermint extract and powdered sugar, whisking until smooth. Let the mixture cool to room temperature (but don’t let it get too stiff) and pour it into a piping bag.
3.       When the cupcakes are cool, insert the tip of the piping bag into the center of the cupcake and press gently to fill the middle of the cupcake with the mint ganache.
4.       For the frosting, in a large bowl, beat the cream cheese and butter until light and fluffy. Add the powdered sugar and mix until smooth. Add the heavy cream and peppermint and vanilla extracts. Beat until light and fluffy.
5.      Frost the cooled, filled cupcakes. Garnish with an unwrapped Andes mint. 

see how thin the batter is? strange...


baked cupcakes

ganache
filling the cupcakes with ganache

me trying to be a piping pro.
frosted!
final product :)


Friday, March 16, 2012

Boozy Bailey's Brownies

HAPPY ST. PATRICK'S DAY!

And my gift to you on this lovely Irish day is these Boozy Bailey's Brownies!

how festive and delicious is that?!?!

I made these with my friend Michelle. We had a pre-St. Patrick's Day bake and beverage get-together a couple weekends ago.


going back to my bartending days

white russians --> green irishmen?

Happy Pre-Patty's Day!

The brownies have a hard crusty exterior and a fudgy center.  The frosting is light and creamy.

Chocolatey. Sugary. Boozy.  Need I say more to convince you to make these?

Now I'm off to drink green beverages with my mom and friends all day! I'll also be wearing a tiara and a shirt that says "Kiss me, I'm drunk". God, I love being young and Irish on March 17th!

Boozy Bailey’s Brownies (adapted from How Sweet It Is)
For the brownies
  • 1 stick unsalted butter
  • 2-3 squares baking chocolate
  • 2 cups sugar
  •  2 eggs
  • 1 cup flour
  • 1 teaspoon vanilla
  • 1/4 cup Bailey’s Irish Cream
For the buttercream
  • 1 stick unsalted butter, room temperature
  • 3 cups powdered sugar, sifted
  • 6 tablespoons Bailey’s Irish cream
1.       Preheat oven to 350.
2.       Melt butter and baking sqaures in a microwave safe bowl. In the mixing bowl, cream melted butter and chocolate mixture. Add in sugar and vanilla and beat until fluffy, about 2-3 minutes. Add in eggs, beating one at a time. Add flour and stir just until combined. Stir in Bailey’s.
3.       Pour into greased 9 x 13 baking dish (I used a 10 x 10 square cake pan).  Bake for 30-40 minutes, or until just barely done.
4.       For the frosting: In a stand mixer with the paddle attachment, beat the butter until it is light and fluffy. Add the sugar 1/2 cup at a time. Add the Bailey's one tablespoon at a time. Beat until smooth and creamy. 
5.       Wait until the brownies are fully cooled and frost. These are the kind of brownies that have a hard top and a fudgy middle so don’t worry if the top of your brownies are pretty hard.


I want to drink the Bailey's from the bottle and eat the frosting with a shovel. Not appropriate?

See what I mean about the hard exterior and the fudgy center?

This is basically like three shots.