Showing posts with label cake. Show all posts

Saturday, August 11, 2012

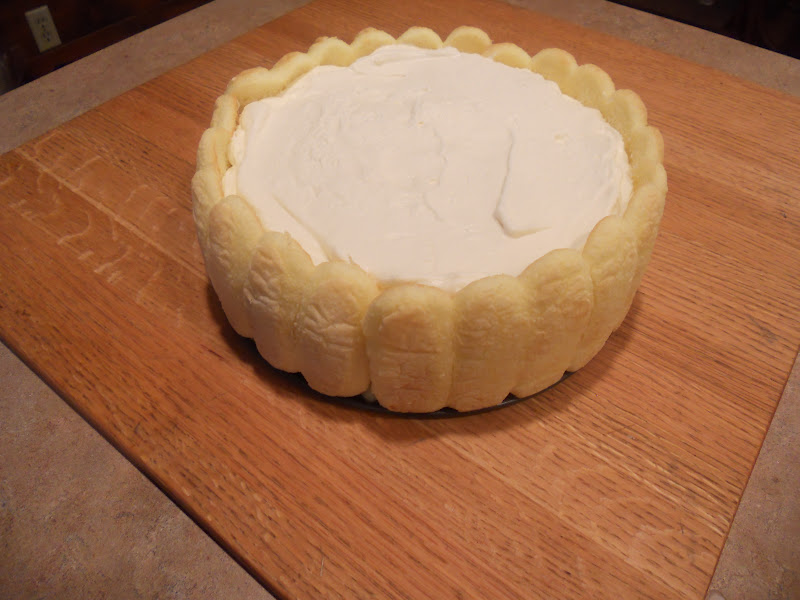
Creamy Ladyfinger Cake with Raspberry Sauce

Ok, so this is the FINAL piece of my grandmother's birthday dinner.

She gave me this recipe and asked if I would try it out. I had never used lady fingers before so I was a little nervous. But she said that it tasted just how she remembered and everyone loved it!

It was basically like a very light version of cheesecake! The lady fingers make for a very light and fluffy crust and the filling isn't nearly as dense as cheesecake but is still fairly rich from the cream cheese and heavy cream. Because it's lighter, you can eat a big slice without feeling sick, which I love :)

This recipe looks very elegant but comes together very quickly because the lady fingers are premade, the filling whips up quickly, and the "sauce" is ready as soon as the carton of frozen raspberries in juice thaws. Hey, that's what the recipe called for! So for once it wasn't me being a lazy bum. Surprising, right?

The leftovers also hold up very well. I thought that the ladyfingers might get soggy but I ate it for 3 days after and it was delicious every time!  Just keep the sauce in a separate dish and add it right before you eat it.

On a side note, I'm very glad that this dessert worked out so well because the other dessert was a total flop. At almost every single holiday, my family makes a chocolate pie. It's just a pie or graham cracker crust filled with chocolate pudding.

Now, given how often I have: 1) seen this pie made, 2) eaten this pie, and 2) made recipes far more complex than this simple pie... you would think that I would be able to make this with my eyes closed.  NOPE. It came out like soup. Why? Because I cannot seem to read directions all the way through. I read the first part of the directions and followed them for pudding. If I would have continued to read, I would have noticed that the recipe said to use less milk if using the pudding for a pie.  I've learned my lesson because the pie came out looking like this.

mushy pie
yeah, it looks like poop.


Everyone laughed at me. Ms. Expert-Chef-In-Training can't even make an instant pudding pie. Awesome. At least I'm not too ashamed acknowledge my epic failures.

I just think that my culinary skills did not want to be stifled but something so boring and simple so my brain just rejected the pie so that people would focus their attention the other creamy, tart, homemade, beautiful dessert. That's my excuse and I'm sticking to it.

Creamy Ladyfinger Cake with Raspberry Sauce (8 servings)

  • 2 packages of lady fingers
  • 1 8 oz cream cheese (I used fat free)
  • 1 3 oz cream cheese
  • 1 cup granulated sugar
  • 1 tsp vanilla
  • 1 pint heavy cream 
  • 2 10 oz containers of frozen raspberries in juice
  1. Line the bottom of a 9-inch springform pan with lady fingers. Line the sides of the springform pan with ladyfingers (going up and down, the outside facing the pan so that they will show when the pan is removed). 
  2. Beat together the 2 packages of cream cheese, sugar, and vanilla until smooth. Set aside.
  3. Beat the heavy cream until stiff peaks form. Gently mix the whipped cream into the cream cheese mixture until completely combined. Do not over-mix.
  4. Put half of the mixture into the springform pan. Smooth it over with a spatula. Place another layer of ladyfingers on top of the cream cheese mixture. Layer the other half of the cream cheese mixture on top of the lady fingers. 
  5. Chill the cake overnight. Serve with thawed raspberries in juice. We chose to add the raspberry sauce to each individual slice so that the cake wouldn't get soggy. 

um, I probably could have made this look a little nicer...

the base

beginnings of layer two
ready to chill overnight
so pretty!
with raspberries :)


Monday, July 9, 2012

Patriotic Trifle

I was looking through my camera and I realized that I forgot to post my 4th of July recipe! Food blogger fail. Especially for me because I get really excited about making themed food. And parties. And outfits. I blame my love for all things themed on my four years of sorority life <3

I made this patriotic trifle to bring to a family friend's barbeque. I had to whip something up really quickly because I was soaking up the sun all day and did not feel like being cooped up in the kitchen. I threw together this trifle in about 30 minutes so it was perfect!

This dessert is easily adaptable. I used angel food cake, strawberry puree, vanilla pudding, and blueberries and strawberries for the layers. You can use any flavor of cake, fruit puree/alcohol (to moisten the cake), pudding, and fruit/candy topping that you'd like. The possibilities are endless! My mom makes a boozy version with chocolate cake, Bailey's, chocolate pudding, and Heath Bar pieces. Everyone goes absolutely crazy for it. The important thing to remember is the order of the layers:

  1. Cake
  2. Fruit puree/alcohol
  3. Pudding
  4. Cool whip
  5. Toppings (fruit/candy)
  6. Repeat!
I cannot wait to experiment with more flavor combinations!  I will definitely be making plenty of other versions because: it's so easy to put together; it tastes great; and it's very pretty if the layers are carefully assembled. This is perfect for a party because it's cheap and makes a ton of servings!

So happy belated 4th of July! I'm within a week so it's still acceptable to celebrate, right?

Patriotic Trifle
  • 2 angel food cakes
  • 2 boxes instant vanilla pudding (I used sugar free)
  • 1 quart whole milk
  • 1 large container Cool Whip (I used fat free)
  • 1 Tbsp granulated sugar
  • 2 Tbsp water
  • 2 16 oz containers strawberries, sliced
  • 2 pints blueberries
  • 1 banana, sliced
  1. Prepare the instant pudding according to the directions on the back of the package (I used 1 quart of whole milk for two packages of pudding mix). Chill in the refrigerator for about a half hour.
  2. Puree 1 cup of strawberries with the sugar and water. Set aside.
  3. Tear up one angel food cake into bite-sized pieces. Place in an even layer at the bottom of a large, clear serving bowl.
  4. Pour half of the strawberry puree over the cake layer. 
  5. Spread half of the pudding evenly over the cake. Make sure the pudding goes all the way to the sides of bowl so the separation of layers can be seen from the outside of the bowl.
  6. Spread half of the Cool Whip over the pudding layer in the same manner.
  7. Reserve enough strawberries and blueberries for the flag decoration. Combine the rest of the blueberries and strawberries. Make an even layer of fruit. 
  8. Repeat steps 3 through 6.
  9. Create an American flag out of the remaining fruit, as shown in the pictures below.


look at those layers!
Happy 4th of July, America!
yeah, that's a themed dessert and a matching outfit :)
diggin' in!

Saturday, June 2, 2012

Individual Icebox Cakes

Part II of my mom's birthday!

My mom doesn't have a huge a sweet tooth. I can't decide if I'm jealous of her or not. Unlike me, she does not crave sugar, chocolate, peanut butter, candy, cake, cookies, ice cream, and anything dessert related constantly. Seriously, sometimes it's a battle to make myself stop baking cupcakes, seal the bag of gummy candy, and eat some real food. However, she also doesn't understand the happiness and satisfaction that I feel when I sit down each evening and indulge in my nightly dessert at exactly 9:30. Pure. Bliss.

Anyway, I asked my mom what she wanted for her birthday dessert. I sort of expected her to say "nothing" or name someone else's favorite dessert. But she surprised me and immediately told me that she had been craving a mint icebox cake. Your wish is my command, mom!

delivering the requested goodies!


My grandmother always used to make an icebox cake with creme de menthe in the traditional log form. As I've mentioned before, I'm not in love with mint. And if I'm going to make a dessert, I want to be able to enjoy it. I prefer my refrigerator cake flavored with Kahlua. Coffee and chocolate is always winning combo in book. I know my mom agrees because, though my sweet tooth is a personal struggle, I get my coffee addiction from her. However, my mom specifically mentioned mint and her boyfriend despises coffee so I was torn. That's when I came up with the idea to make individual icebox cakes!

The individual icebox cakes are far more tedious to make than the log but I like them better. The traditional icebox cake is supposed to be sliced at an angle so that you can see the cookie layers. In reality, it always ends up looking like a bowl of mush because the cake is too soft to slice or dish out. The individual cakes are so cute and the layers stay in place as you dig into it with your fork. Also, it's perfect portion control! And you can make exactly as many servings as you want/need without any guesswork. The individual desserts solved the problem of flavors because I was able to make half of cakes with creme de menthe and half with Kahlua. Most of the people wanted to try both so I ended up cutting the cakes in half. I stuck strictly with my Kahlua and my mom's boyfriend stuck to his mint... the true stand-off of flavors. Everyone enjoyed the cakes and thought the individual desserts were a great idea!


my mom satisfying her tiny sweet tooth :)


Individual Icebox Cakes (yields about 15 individual cakes) adapted from Smitten Kitchen
  •  2 package of Nabisco chocolate wafers
  • cupcake liners
  • Hershey's chocolate (optional)
  • chocolate covered espresso beans (optional)
For the whipped cream (adapted from How Sweet It Is)
  • 1 cup heavy whipping cream
  •  1/4 cup alcohol (I used Bailey’s Irish Cream and creme de menthe)
  • 1-2 tablespoons powdered sugar
  • 1 teaspoon of vanilla extract
  1.  Flatten 15 cupcake liners.
  2. Whip the whipped cream ingredients until the whipped cream holds firm peaks. Spread about two teaspoons whipped cream between each cookie, to the edges, and stack them on a cupcake liner until you reach the height you’d like (I made each cake using 5 wafers). 
  3. Use a knife to spread frost the entire individual icebox cake with whipped cream. 
  4. Garnish cakes with chocolate shavings and/or espresso beans.
  5. Set them in the fridge at least overnight or up to a day. The cookies will soften as they set, and become cake-like.
  6. Serve immediately from the refrigerator. 


creme de menthe whipped cream
5 cookie stack!
creme de menthe and kahlua


Sunday, April 22, 2012

Cookies and Cream Cupcakes

Happy Earth Day!

I love "holidays" because they are an excuse to bake themed goodies. My friend, Michelle, and I decided to get together to bake some earthy cupcakes and drink fruity beverages. We decided on cookies and cream cupcakes and peach bellinis. YUM!

made with $5 Andre champagne and peach Bacardi with frozen blueberries for ice :)

The cupcakes are great for several reasons. The bottom is half of an Oreo cookie, cream side up. The cake portion is a dense vanilla cake with HUGE chunks of Oreo. I'm glad that I decided to go with chunks instead of crushing the Oreos because it gave the cupcake a nice texture. Oh, and the cream cheese frosting. No explanation necessary.

We decorated them with crushed Oreos to look like dirt and stuck some gummy worms on top. We also tried to make flowers on some with Skittles. Not quite as cute as we had envisioned but juuuuust as tasty. 


The only issue with this cupcakes is that we overcooked them a bit. We took them out and noticed that they were a little gooey on top so we decided to throw them back in the oven for a couple minutes. When we took them out and let them cool, the tops and sides were a little hard. That's when we realized that the gooey-ness was probably due to the cream in the Oreos melting. So don't be fooled by the sneaky goo! They still tasted delicious, just not as moist as they could have been.

Cookies and cream is always a crowd pleaser with kids and adults. And the surprise Oreo bottom takes the cupcakes to a whole new level. Making these for someone with a serious cookies and cream addiction? Serve it with a scoop of cookies and cream ice cream for a decadent overdose :)

Cookies and Cream Cupcakes (24 cupcakes) from Beantown Baker

For the cupcakes
  • 1 stick unsalted butter, at room temperature
  • 1 cup milk
  • 2 tsp vanilla extract
  • 2 1/4 cups flour, plus 2 Tbsp for the Oreo chunks
  • 1 tsp baking powder
  • 1/2 tsp salt
  • 1 2/3 cup sugar
  • 3 large egg whites, at room temperature
  • 1 pkg Oreo cookies
For the frosting
  • 4 oz cream cheese at room temp
  • 1/2 stick (4 Tbsp) butter at room temp
  • 1/2 Tbsp vanilla
  • 2 cups powdered sugar

  1. Preheat oven to 350F. Insert liners into a medium cupcake pan.
  2. Twist apart 24 Oreos. Place the wafer with filling on it, filling side up, in the bottom of each paper liner.
  3. Cut the remaining Oreo cookies into quarters with a sharp knife. Toss with 2 Tbsp flour and set aside.
  4. In a large bowl cream the butter until fluffy, about 3-5 minutes. Add the milk and vanilla and mix to combine.
  5. In a separate bowl mix together the flour, baking powder, and salt.
  6. Add the dry ingredients to butter mixture. Mix until integrated. Stir in sugar. With an electric mixer on low speed, beat for 30 seconds. Turn the mixer up to medium speed and beat for 2 minutes. Add the egg whites. Beat for 2 more minutes. Stir in the quartered cookies.
  7. Fill the cupcake lines three-quarters full. Bake for about 20 minutes (maybe even 18) or until a toothpick inserted in the center of cupcakes comes out clean. Cool cupcakes in the pan.
  8. While the cupcakes are cooling, make the frosting. Place the cream cheese in the bowl of your mixer. Beat on medium-high until completely smooth, 3-4 minutes. Add the butter and continue to cream until fluffy. Add vanilla extract. Add powdered sugar 1/4 cup at a time until desired consistency is reached.
  9. Frost the cupcakes. For dirt cupcakes, garnish with crushed Oreos and gummy worms. For regular cupcakes, garnish with crushed Oreos and half of an Oreo.


Oreo bottoms

flour coated Oreos

unbaked
baked
Happy Earth Day!


Saturday, March 24, 2012

Cake Balls

These are my new favorite dessert for entertaining because:

  1. They are bite-sized. 
  2. They are easy to make.
  3. They are easy to make in obscenely large quantities. 
  4. They are super cute. 
  5. You can mix and match about a million flavor/color combinations. 
  6. They last in an airtight container in the refrigerator for up to two weeks. 
  7. They freeze well.
  8. You can make ball jokes the entire time you are handling and eating them. Heh heh...
What else could you possibly ask for?

Oh... you're asking for St. Patrick's Day themed cake balls?

YOU GOT IT!

But also make these for every holiday or get together that you ever have. Ever. I promise that they'll be a total hit!

Cake Balls (makes 40-50 balls)
  • Box of cake mix + ingredients for baking (I used white cake with green food coloring)
  • 1 – 1 ½ cans of frosting (I used vanilla)
  • 1 ½ bags of candy melts (I used white)
  • About 3 Tbsp Crisco
1.       Bake the cake in a 9 x 13 pan according to the directions on the box.
2.       Allow the cake to cool completely (it can be a tiny bit warm to help the frosting melt). Crumble into a bowl.
3.       Mix in the frosting until you have an even mixture.
4.       Form the mixture into small balls (about 1 ½ tablespoons) and place them on a baking sheet lined with wax paper.  Put in the freezer for about a half hour or until firm.
5.       While the balls are in the freezer, melt the candy melts in a double boiler or fondue pot. Add Crisco in order to thin the mixture.
6.       Take the cake balls out of the freezer.  Poke each ball with a toothpick and dip into the candy melts.  You may need to use a small spatula to cover the top. Place the candy-coated ball back onto the wax paper. Apply sprinkles (if desired) immediately so they stick. Continue this process with the rest of the balls.
7.       Let the candy coating cool completely. Package in an airtight container. These will keep in the refrigerator for up to two weeks!


rolling some balls


dipping some balls

look at these perfect balls!

Sunday, February 12, 2012

S'mores Mug Cake

I've seen mug cakes floating around the food blog scene for a while and I resisted them for three main reasons.

#1 - I just didn't think it was possible. If it really worked and tasted awesome then why wasn't everyone baking cakes in their microwave for every single meal? And why would anyone bother baking a full-sized cake that you have to wait over thirty minutes for when you could make a perfect portion in less than two minutes? It just didn't make sense.

# 2 - If a wonderfully tasty cake could be made in the microwave, it would be my only form of nourishment for at least a month after I discovered it. I work too hard at the gym for this to happen so I avoided the mug cake because I was afraid it would give me a muffin top.

#3 - I didn't have a microwave-safe mug.

Well, I found a microwave safe mug. And I realized I had all of the ingredients to make this s'mores mug cake (from one of my favorite blogs - it's well-written and filled with delicious recipes; and the writer, Jessica, is hilarious).

Time to experiment.

This cake came together so quickly and easily. I baked it for 90 seconds and it came out perfectly! It was extremely rich, to the point where I wasn't sure if I'd be able to finish it. Don't worry. I did. Me? Waste cake? Absolutely not. I added a little milk to it to cut the richness a bit and add some moisture.  It also helped to cool it down a little... since obviously waiting a minute or two was not an option.

Did I mention that it was delicious? Because it absolutely was. In fact, I've been thinking about it all day and trying to come up with other versions (you KNOW a peanut butter one is in the works).

I know that I should eat dinner before dessert but... why go through the motions when I know what I really want? If I'm still hungry after, I'll eat dinner. Or maybe just another mug full of rich chocolate-y heaven... 

Whatever. It's the weekend before Valentine's Day and I'm newly single for the first time in what feels like forever. I reserve the right to do nothing but eat desserts, drink wine, and watch romantic movies all weekend. So far I've seen Heartbreakers, When in Rome, P.S. I Love You, 27 Dresses, Have You Heard About the Morgans?, He's Just Not That Into You, Rumor Has It, The Ugly Truth, and, of course, The Notebook. 

I'm not even ashamed. Just a little delirious from all the sugar. Oh yeah... and the wine.

Matching mugs of coffee and herbal tea :)


5 Minute S’mores Mug Cake (1 mug) from How Sweet It Is
·         1 graham cracker, crushed
·         3 1/2 tablespoons unsalted butter, melted
·         2 tablespoons granulated sugar
·         1 large egg
·         1/2 teaspoon vanilla extract
·         1/4 cup flour (I used whole wheat)
·         2 tablespoons unsweetened cocoa powder (mine was dark cocoa, hence the dark color)
·         1/8 teaspoon baking powder
·         pinch of salt
·         1 1/2 ounces milk chocolate (I used mini chips)
·         marshmallows (I used minis but you could use regular sized marshmallows. Fluff would also be great but I did not have any on hand.)
1.       Combine 3 tablespoons butter and 1 ounce of chocolate in a small bowl. Melt in the microwave for about 30 seconds. Set aside. In your mug, melt the remaining 1/2 tablespoon of butter. Mix in the crushed graham crackers and press to the bottom of the mug.
2.       In a bowl, whisk together the egg, sugar and vanilla. Add in flour, baking powder, salt and cocoa, stir until a thick batter forms. Mix in the melted butter and chocolate a little at a time. Fold the remaining chocolate chips into the batter. Add half of the mixture on top of the graham crust, then add a layer of marshmallows or fluff. Add the other half of the batter on top of the marshmallows. 
3.    Microwave for 90 seconds**. Remove and top with additional marshmallow. Put the mug back in the microwave for 5-10 seconds to melt them. Remove and sprinkle with graham crumbs for the perfect s'mores finish :)
**Your cooking time may vary depending on the strength of your microwave and the consistency that you want your cake to have. 


The mug was only 3/4 full before "baking". It rises a ton!
Perfection in a mug.